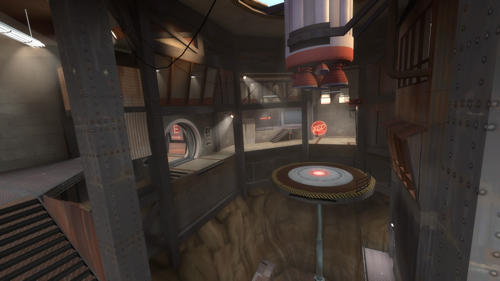
Few online multiplayer games have become as habitual for me as Team Fortress 2. I’ve returned to it every few months since its release back in 2007, usually to plumb the strategic depths of a handful of familiar maps. In August of 2008, the Heavy update introduced Steel, a community map created by Jamie “Fishbus” Manson. Its complex layout and objective structure immediately intrigued me, and after hundreds of matches it has become one of my all-time favourite multiplayer maps.
Steel is an asymmetric attack/defend control point map. The red team begins with all five points under their control, but the blue team only needs to claim control point E within the allotted time to win the game. While E is open for the entire match, capturing it early is a daunting challenge. The control point is perilously situated right outside the red team’s spawn point and across a bottomless chasm. To make matters worse, E’s capture timer is twice as long as any of the other control points.
To facilitate their assault on the final control point, the attacking team can unlock strategically advantageous layout changes by claiming four optional control points (A through D). Bases shift, objectives change, new routes open up while others are closed off; every change has a significant impact on the high level flow of combat. While other control point maps tend to split each stage of combat into a segregated segment of the map, Steel cleverly folds five stages into one large contiguous layout. Each sequential pairing of A-D and E effectively functions as a distinct stage of the match. This iterative repurposing of the combat space is a large part of what makes Steel unique and noteworthy, and is a something I believe is deserving of detailed design consideration.
To demonstrate this, I’ve annotated the following overhead maps to visualize a loose concept of “combat flow”. The lines represent optimal or strategically valuable routes from spawn points to objectives, and tend to represent where combat will take place. By analyzing these player flow patterns, we can better appreciate how each phase of the match demands that players redefine and reinterpret the combat space.
Phase One – Control Points A & E
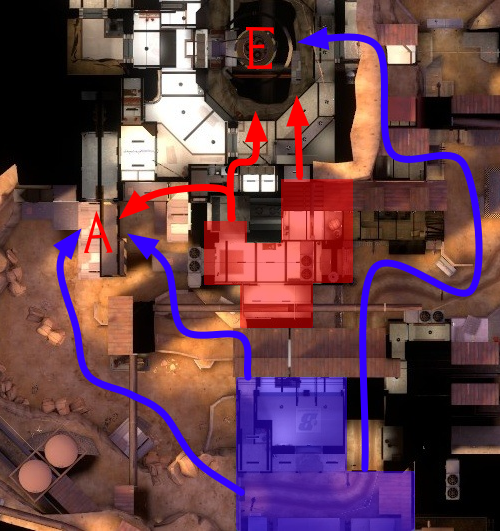
The first optional control point available for capture is A. It is situated in the southwest corner of the map, inside a small shack atop a gently sloping hill. The defending team can reach A by simply stepping through the western gate of their spawn camp. They have a 60 second setup phase to fortify the control point undisturbed.
To capture A, the blue team has a choice of two main attack routes. The spawn camp’s main exit opens into large wide corridor winding around to approach the point from the west. Curving around the enemy spawn point in this manner affords a certain degree of safety. However, this route has several drawbacks: long sight lines make defending Snipers a serious threat, a blind corner could conceal an enemy sentry nest and Spies often lurk in the open plain’s nooks and crannies.
The alternate northwestern exit of the blue team’s spawn sends players onto an elevated plateau. This point overlooks the capture point, making it an ideal shooting range for Demomen and a rapid launch point for Medic ubercharges. To dissuade blue players from poking over the ridge, astute defenders will often place a sentry gun on the elevated platform in the back corner of the base.
Control point E is open for capture throughout the match, though it is exceptionally difficult to do so early on. It’s located on a small circular platform surrounded by a bottomless chasm, a gap that can only be crossed by double jumping (Scouts) or rocket jumping (Soldiers/Demomen). The path to E is quite long, winding past locked capture point B. Furthermore, the defenders can quickly respond to an attack on E by exiting through their spawn camp’s eastern gate or sniping from the western window.
Control point A can be a tough nut to crack, so an all-out assault is often not be the best approach. Skilled attackers will apply calculated pressure at E in order to pull some of the defensive force away. This allows their team mates to make a push for A while the enemy forces are distracted. The tactic of splitting the defender’s focus in this manner is crucial to offensive success in Steel.
Phase Two – Control Points B & E
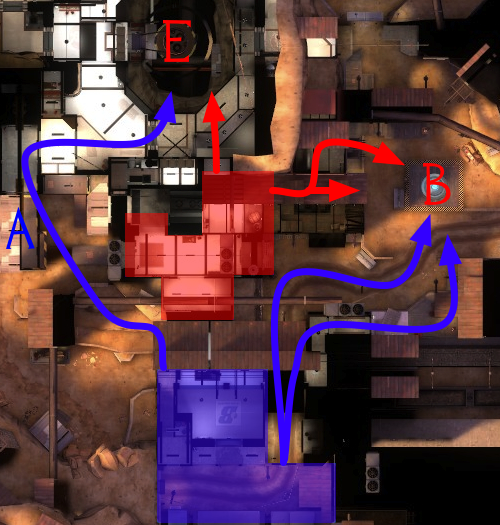
Claiming control point A unlocks two nearby doors: one through the back of the shack leading to D/E and the other opening a short underground route towards B (not shown on above map). The first path permits the attackers to stealthily assault E, though the efficacy of splitting the defenders in this phase is greatly reduced due to the close proximity of B and E.
Control point B is a rectangular yard in a courtyard surrounded by tall buildings. A small wooden fence blocks the western approach. Since the point isn’t immediately visible from the defender’s spawn point, it can be quite difficult to recapture it once the red team starts pushing. An alternate path from the defender’s spawn camp leads to an east-facing second storey window, an ideal camping spot for defending Snipers and Demomen.
The blue team can mount their attack along two parallel paths. Travel on the lower path is slightly longer, sloping upwards into the underside of B. The route bisects a man-high wall, which can function as loose cover for both sides. There’s also a ramp leading to the roof of a small shed, but this detour rarely provides an offensive advantage. The higher path leads to a ridge overlooking the entire courtyard, an advantageous position that carries the risk of high visibility. There is also a windowed hut on this ledge, just opposite the one available to the defending team.
Phase Three – Control Points C & E
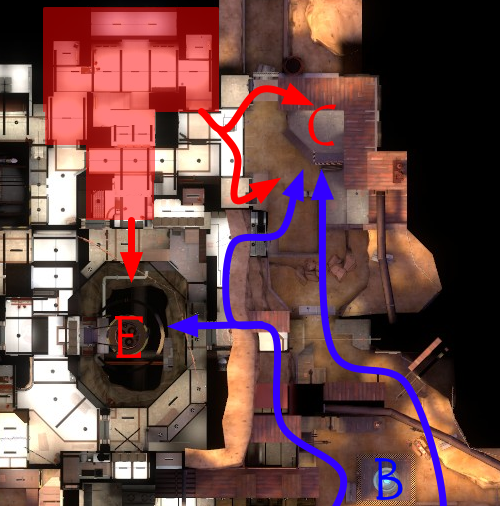
If the blue team manages to capture control point B, two major changes occur: the door blocking the eastern path towards C slowly opens and the red team’s spawn camp is shifted to the far northern side of the map. Though the defenders continue to spawn right outside E’s northern approach, the attackers have effectively gained control the entire southern half of the map. You may notice that the blue team’s camp is now far away from current objectives; this is a key element of the attack/defend asymmetry, but the disadvantage can be negated by the strategic construction of teleporters.
The area around C is characterized by a strong contrast between high ground and low ground. The control point is located on an elevated balcony nestled into the back corner of the base. The red team also controls a small ledge just south of their spawn camp overlooking C. Both of these positions are high above ground level, offering long sight lines for Snipers and elevated sentry nooks for Engineers. Fighting in the pit below often devolves into a messy brawl, somewhat favouring Pyros and Scouts.
The blue team controls an opposing elevated ridge on the southeastern side of the base, which is a great place for Engineers to set up camp. Large rock crenellations offer convenient cover for Soldiers, Snipers and Demomen to bombard C’s defences from. The western path is also a strong candidate for offensive fortification, as it allows quick access to both available control points. From here, blue players can move between C and E almost as quickly as red players, splitting the defender’s focus very effectively.
Phase Four – Control Points D & E
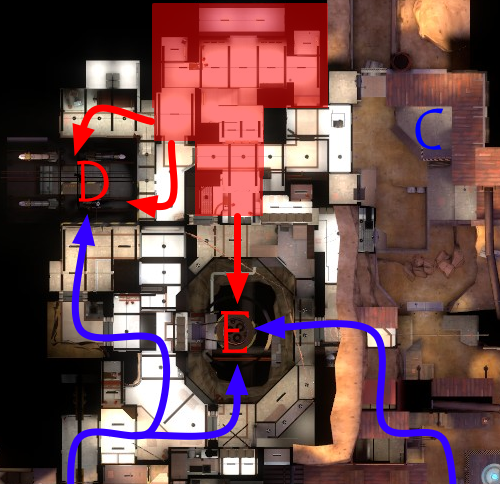
If control point C is captured, three bridges extend across the chasm surrounding E. This layout change has two important consequences. Firstly, whereas control point E was previously available only to Scouts, Soldiers and Demomen, it can now be captured by any of the nine classes. Secondly, a major central route now connects the north and south ends of the map. Both of these factors make E significantly easier to capture, spelling doom for uncoordinated defenders.
The red team can immediately reach D and E through the spawn camp’s western and southern doors respectively. With the final control point now vulnerable, the defenders must be vigilant about concurrently defending both points. This is usually achieved by moving between bases as threats arise, though a cleverly constructed sentry gun can cover both approaches at once.
The blue team can now take advantage of a door that was unlocked in the first phase, allowing them to traverse the long northwestern path from A to D. The winding eastern route previously used to attack B and C now becomes the principal attack vector for E.
There are also two minor attack routes that I omitted from the diagram for clarify purposes. Firstly, any blue players left straggling at C at the end of the last phase can sneak westward by passing in front of the red team’s spawn camp. Secondly, there is a window overlooking E from A which is ideal for Snipers (you may recall that this nest was previously under the red team’s control in phase one.)
Phase Five – Control Point E
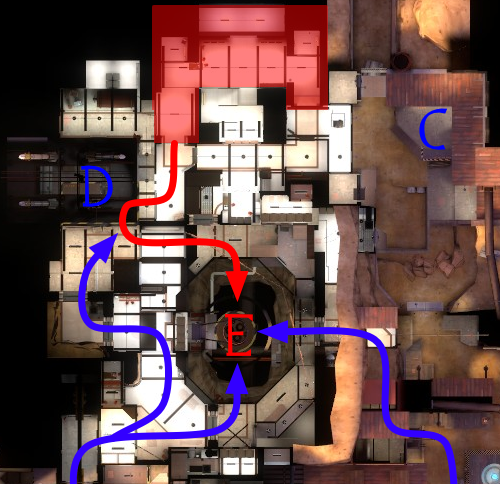
Occasionally the blue team will manage to capture all four optional control points before capturing E. Claiming D blocks off the red spawn camp’s southern exit, forcing defenders to take the longer western route to get back into the fight. The three bridges to E also sprout guardrails, protecting players from being pushed into the abyss. The blue team can continue their assault via the roads from A and B, or attempt to intercept respawning red players at D. These layout changes put the red team at a severe disadvantage; their only hope is to make a noble last stand and try to run out the timer.
I suspect that these diagrams and descriptions will fail to evoke the real experience of playing Steel. Beyond the inherent limitations of projecting a 3D space onto an overhead map, there are multitudes of small clever design decisions that these high-level illustrations fail to capture. However, I hope these annotations do reveal how Steel cleverly creates five distinct combat scenarios superimposed over one layout. This unusual map rewards those who can reinterpret the changing space around them. Failure to attack or defend Steel is often more fundamentally a failure of adaptation and imagination.






February 28th, 2011 at 6:49 am
Great post Matthew!
Makes me wish I wasn’t terrible at TF2. :)
March 1st, 2011 at 10:43 am
Brilliant. Reminds me of an old Doom guide I still have laying around, describing the layout of—and progress through—each of the game’s levels. It fascinated me then as this does now.
I’ve played Steel all of twice perhaps (haven’t played much TF2 period), so I had no idea how dynamic the level is. Fantastic asymmetric design, and an awesome analysis. A+++, would reference again.
March 7th, 2011 at 1:44 pm
I think this would work better as a video. Still, an excellent article. You explained just why I consider Steel to be TF2’s best map.
March 17th, 2011 at 7:20 am
I have a deep love for the map, it forces you to play with good teamplay – the individual classes (Spy, Sniper, Scout) can really kill this off if there are too many – it brings a natural balance to the game. It can slow down if the Red defenders have enough time to entrench, but this rarely happens for long enough unless they’re simply the better team.
Very good overall description. Some of the flow you’ve missed out on – noting that for instance there is a valid reason to kill off attackers even if you will lose a point, since the flow of a mass of attackers onto the next point (via the routes you mention but do not mark) might be too much at once for the now-preparing/respawning defenders. Also the distractions later in the game, especially the open routes ready for forward offensive engineer construction on E from the west entrance door is interesting and unseen on any other map! (also the fact a sniper or soldier can lock down E from defending engineers pretty effectively and very early on is unseen elsewhere – here it is considerably fairer because of it, on other maps it’d be deemed unfair on the defenders).
I’d also love a video; the actual introduction video is pretty short and neat (and very professional), so perhaps linking to it on youtube is a good idea for those who are unfamiliar with it.
His other map, Freight, takes a new angle on the trains seen in Well – them being much slower and covering all of the points in the map. It also involves some complex topology and layout design as well – not as good as Steel overall but for a symmetrical map, one of the best community additions.